Beagle Detector: Fine-tune Faster-RCNN
In this post, we'll see how to create a Beagle Detector using Faster-RCNN. Faster-RCNN is the state-of-the-art object detection model in terms of detection accuracy.
The beagle dataset we are using today is the same as the previous post. This dataset is originally created and prepared for instance segmentation tasks by meself. But it has all the necessary information in the annotations file for creating an object detector. So, we will stick to this dataset. The only thing that matters is how you should parse the annotations which I will show you soon. Let's get started.
Understanding the Data
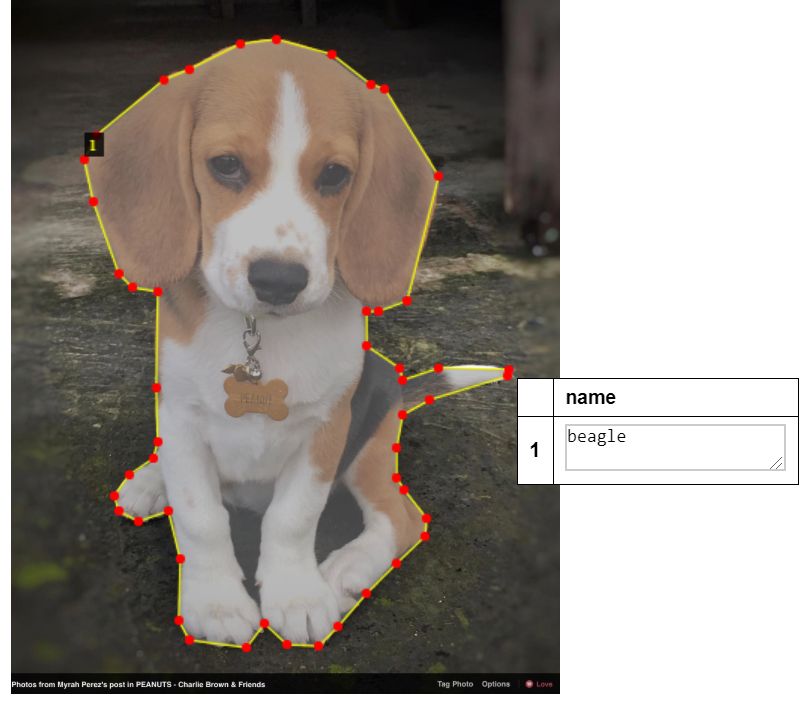
The dataset I prepared contains a total number of 100 beagle images which I scraped from Google Image. 75 of them are used for training and 25 of them are used for validation. The dataset was annotated using VGG Image Annotator (VIA), and it labels all the images and exports it to a single JSON file.
Because the dataset is originally created for instance segmentation task, the JSON file contains the whole mask information (polygon points) rather than bounding boxes as shown below. So need to parse the polygon points to obtain corresponding bounding boxes.
Load the Data
Use the following code to download the dataset.
!git clone https://github.com/haochen23/fine-tune-MaskRcnn.git
!cp -r fine-tune-MaskRcnn/beagle/ ./beagle/
The dataset is structured as follows:
beagle/
    train/
        00000000.jpg
        00000002.jpg
        00000005.jpg
        ...
        via_region_data.json
    val/
        00000168.jpg
        00000170.jpg
        00000176.jpg
        ...
        via_region_data.json
The via_region_data.json contains the annotation data for train/ or val/.
Define a Dataset Class to Parse the Data
All the mask polygon points data are store in the "region" field. So we can get bounding box information by picking up xmin, xmax, ymin, ymax as in the code.
import os
import numpy as np
import torch
import torch.utils.data
from PIL import Image
import json


class BeagleDataset(torch.utils.data.Dataset):
    def __init__(self, data_dir, transforms=None):
        self.data_dir = data_dir
        self.transforms = transforms
        # load the annotations file, it also contain information of image names
        # load annotations
        annotations1 = json.load(open(os.path.join(data_dir, "via_region_data.json")))
        self.annotations = list(annotations1.values())  # don't need the dict keys


    def __getitem__(self, idx):

        # get the image path from the annoations data
        img_name = self.annotations[idx]["filename"]
        img_path = os.path.join(self.data_dir, img_name)
        img = Image.open(img_path).convert("RGB")

        # first id is the background, objects count from 1
        obj_ids = np.array(range(len(self.annotations[idx]["regions"]))) +1
        # get bounding box coordinates for each object
        num_objs = len(obj_ids)
        boxes = []

        for i in range(num_objs):
            xmin = np.min(self.annotations[idx]["regions"][i]["shape_attributes"]["all_points_x"])
            xmax = np.max(self.annotations[idx]["regions"][i]["shape_attributes"]["all_points_x"])
            ymin = np.min(self.annotations[idx]["regions"][i]["shape_attributes"]["all_points_y"])
            ymax = np.max(self.annotations[idx]["regions"][i]["shape_attributes"]["all_points_y"])
            boxes.append([xmin, ymin, xmax, ymax])

        boxes = torch.as_tensor(boxes, dtype=torch.float32)
        # there is only one class
        labels = torch.ones((num_objs,), dtype=torch.int64)

        image_id = torch.tensor([idx])
        area = (boxes[:, 3] - boxes[:, 1]) * (boxes[:, 2] - boxes[:, 0])
        # suppose all instances are not crowd
        iscrowd = torch.zeros((num_objs,), dtype=torch.int64)

        target = {}
        target["boxes"] = boxes
        target["labels"] = labels
        target["image_id"] = image_id
        target["area"] = area
        target["iscrowd"] = iscrowd

        if self.transforms is not None:
            img, target = self.transforms(img, target)

        return img, target

    def __len__(self):
        return len(self.annotations)
Define Model Architecture
As we are fine-tuning Faster-RCNN, we need to replace its box_predictor with a new one, which only predict two classes - background and beagle.
import torchvision
from torchvision.models.detection.faster_rcnn import FastRCNNPredictor
from torchvision.models.detection.mask_rcnn import MaskRCNNPredictor

def build_model(num_classes):
    # load an instance segmentation model pre-trained on COCO
    model = torchvision.models.detection.fasterrcnn_resnet50_fpn(pretrained=True)

    # get the number of input features for the classifier
    in_features = model.roi_heads.box_predictor.cls_score.in_features
    # replace the pre-trained head with a new one
    model.roi_heads.box_predictor = FastRCNNPredictor(in_features, num_classes)
    return model
Training the Model
The training process is the same as the previous post, so we'll make it short. We again will use some helper functions from PyTorch repo to train the model. I've put everthing together in one repo, including all the data, code and helper functions, feel free to use it.
Load Data and Transform
from engine import train_one_epoch, evaluate
import utils
import transforms as T

def get_transform(train):
    transforms = []
    # converts the image, a PIL image, into a PyTorch Tensor
    transforms.append(T.ToTensor())
    if train:
        # during training, randomly flip the training images
        # and ground-truth for data augmentation
        transforms.append(T.RandomHorizontalFlip(0.5))
    return T.Compose(transforms)

# use our dataset and defined transformations
dataset = BeagleDataset('beagle/train', get_transform(train=True))
dataset_test = BeagleDataset('beagle/val', get_transform(train=False))

# define training and validation data loaders
data_loader = torch.utils.data.DataLoader(
    dataset, batch_size=2, shuffle=True, num_workers=4,
    collate_fn=utils.collate_fn)

data_loader_test = torch.utils.data.DataLoader(
    dataset_test, batch_size=1, shuffle=False, num_workers=4,
    collate_fn=utils.collate_fn)
Initialize Model and Optimizer
device = torch.device('cuda') if torch.cuda.is_available() else torch.device('cpu')

# our dataset has two classes only - background and beagle
num_classes = 2

# get the model using our helper function
model = build_model(num_classes)
# move model to the right device
model.to(device)

# construct an optimizer
params = [p for p in model.parameters() if p.requires_grad]
optimizer = torch.optim.SGD(params, lr=0.005,
                            momentum=0.9, weight_decay=0.0005)

# and a learning rate scheduler which decreases the learning rate by
# 10x every 3 epochs
lr_scheduler = torch.optim.lr_scheduler.StepLR(optimizer,
                                               step_size=3,
                                               gamma=0.1)
Start Training
Use the following code block to train the model, we train 10 epochs. This trainig process may take a while.
# number of epochs
num_epochs = 10

for epoch in range(num_epochs):
    # train for one epoch, printing every 10 iterations
    train_one_epoch(model, optimizer, data_loader, device, epoch, print_freq=10)
    # update the learning rate
    lr_scheduler.step()
    # evaluate on the test dataset
    evaluate(model, data_loader_test, device=device)
Inference
Now our model is ready for making inference. We need to define a few util functions in order to visualize the results. The code below is well explained by the comments.
# set to evaluation mode
torch.save(model, 'faster-rcnn-beagle.pt')
model.eval()
CLASS_NAMES = ['__background__', 'beagle']
device = torch.device('cuda') if torch.cuda.is_available() else torch.device('cpu')
model.to(device)
%matplotlib inline
from PIL import Image
import matplotlib.pyplot as plt
import torch
import torchvision.transforms as T
import torchvision
import numpy as np

import cv2
import random
import warnings
warnings.filterwarnings('ignore')


def get_prediction(img_path, confidence):
  """
  get_prediction
    parameters:
      - img_path - path of the input image
      - confidence - threshold value for prediction score
    method:
      - Image is obtained from the image path
      - the image is converted to image tensor using PyTorch's Transforms
      - image is passed through the model to get the predictions
      - class, box coordinates are obtained, but only prediction score > threshold
        are chosen.

  """
  img = Image.open(img_path)
  transform = T.Compose([T.ToTensor()])
  img = transform(img).to(device)
  pred = model([img])
  pred_class = [CLASS_NAMES[i] for i in list(pred[0]['labels'].cpu().numpy())]
  pred_boxes = [[(i[0], i[1]), (i[2], i[3])] for i in list(pred[0]['boxes'].detach().cpu().numpy())]
  pred_score = list(pred[0]['scores'].detach().cpu().numpy())

  pred_t = [pred_score.index(x) for x in pred_score if x>confidence][-1]

  pred_boxes = pred_boxes[:pred_t+1]
  pred_class = pred_class[:pred_t+1]
  pred_score = pred_score[:pred_t+1]
  return pred_boxes, pred_class, pred_score

def detect_object(img_path, confidence=0.5, rect_th=2, text_size=1, text_th=1):
  """
  object_detection_api
    parameters:
      - img_path - path of the input image
      - confidence - threshold value for prediction score
      - rect_th - thickness of bounding box
      - text_size - size of the class label text
      - text_th - thichness of the text
    method:
      - prediction is obtained from get_prediction method
      - for each prediction, bounding box is drawn and text is written
        with opencv
      - the final image is displayed
  """
  boxes, pred_cls, pred_score = get_prediction(img_path, confidence)
  img = cv2.imread(img_path)
  img = cv2.cvtColor(img, cv2.COLOR_BGR2RGB)
  # print(len(boxes))
  for i in range(len(boxes)):
    cv2.rectangle(img, boxes[i][0], boxes[i][1],color=(0, 255, 0), thickness=rect_th)
    cv2.putText(img,pred_cls[i]+": "+str(round(pred_score[i],3)), boxes[i][0], cv2.FONT_HERSHEY_SIMPLEX, text_size, (0,255,0),thickness=text_th)
  plt.figure(figsize=(20,30))
  plt.imshow(img)
  plt.xticks([])
  plt.yticks([])
  plt.show()
Example 1
!wget -nv https://www.macmillandictionary.com/external/slideshow/full/beagle_full.jpg -O beagle.jpg
detect_object('beagle.jpg', confidence=0.7)

Example 2
!wget -nv https://blackpugsite.com/wp-content/uploads/2019/08/pug-vs-beagle.jpg -O beagle2.jpg
detect_object('./beagle2.jpg', confidence=0.7)

Example 3
!wget -nv https://cdn.pixabay.com/photo/2018/12/15/16/01/beagle-3877115_960_720.jpg -O beagle3.jpg
detect_object('./beagle3.jpg', confidence=0.7)

From the above three examples, we see that our beagle detector is pretty much a dog detector. It can hardly tell the difference between beagle and other breeds. The main reason for this is that the training images in our training data contains only beagle images, it hardly learned feature from other dog breeds.
Ways to Improve The most obvious way to improve our beagle detector is to add more training data, training data contains different dog breeds to an comparative amount to beagle images. In this way, the detector can learn features from other dogs and tell the difference between beagle and other dog breeds.
Summary
In this post, we've seen how to fine-tune an Faster-RCNN object detector on a custom dataset. And I've also shown you how to parse json annotated data. Although there are plenty of room to improve our model, the general workflow of fine-tuning Faster-RCNN detector is presented in details.
The code in this post is available in this GitHub Repo.
Comments
comments powered by Disqus